Beginning to Create Your Movie
Now, it’s time to begin making the actual movie! First, you need to make your project file (I told you we’d be coming back to this). Click on the small white symbol underneath the word “File” at the top of the page:
 Now, before you do anything else, click the save button (the little floppy disk symbol), and give your project a name. Now, as you are creating, all you have to do is click that same button and it will save your project automatically.
This is a very important thing to remember to do; creating a video involves a lot of steps, and a lot of work you don’t want to have to go back and redo, so never, ever forget to save often!!
Now, we are going to take a look at the bottom of your screen. This is where you will be spending all your time, now. First, we are going to lay out your pictures and video the way you want them to appear in the movie.
Remember that nothing you do right now is permanent until you convert your project into an actual movie. So, if you decide later you don’t want a particular picture in there, or want to move something around, you can.
Let’s take a look at that timeline, now:
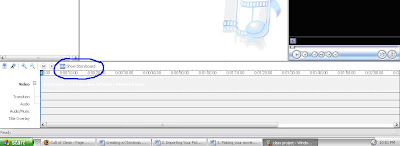
 This is the Timeline view.
If you click the little movie symbol circled above, you will see the Storyboard view:
 Using the Storyboard view makes it easier to see exactly what you have laid out, and you can often add transitions and titles much easier. However, it doesn’t allow you to edit music nor do a lot of the fine tuning you will want to do later.
The rest of this guide will use the Timeline view for everything, but remember you can switch to storyboard if you are having trouble finding where one video segment or picture ends and another starts.
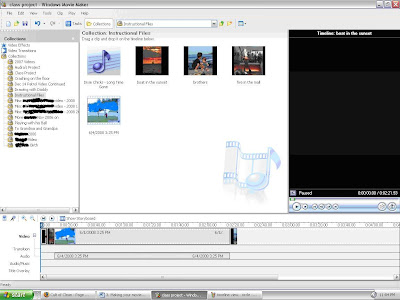
Ok, let’s start moving your movie elements! You can just click and drag your media to the top row of the Timeline. Here is what it looks like after I did that:
 Do you see how there is an audio track underneath the video clip I added? By separating the audio and video tracks, MovieMaker allows you to adjust the sound, or even mute it. Remember that, but don’t worry about it too much right now.
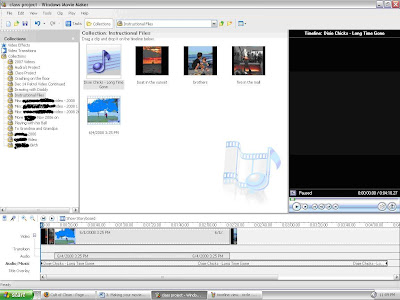
Ok, now add your music file. Drag it to the row below the audio track of the movie. It will look something like this:
 If you click play in the black box to the right of the screen, you can preview what you have so far. Obviously, this isn’t the way you want it to look in the end, so now we need to move on to further editing.
One very important thing to note: When you are editing your movie, always work from the beginning to the end. The reason for this is because of the way MovieMaker lays out the movie. Each track is considered completely separate until you do the final save and make it an uneditable movie. For example, if you add a new picture or title, it will move everything in the Video track to the right, but all of the audio parts will stay the same.
The problem with this is if you’ve lined up a certain part of your music with video or pictures near the end of the movie, changing something in the front of it will mess this up. You’ll have to pick your way through it to make it all line up again. This is my number one frustration with the program.
Coming up Next: Adding Titles


1 sonar pings:
You rock! I really appreciate the guided tour as it were. I am eager to try this so I Will be checking back to see how it goes.
Post a Comment